Butcher Box, part four: Organic Chicken Thighs
A person can't live on red meat alone. There must be balance in all things. When we don't find balance, we fall. When it comes to food, we can fall into a rut, cycles of bad health, bad habits, etc etc. So, for a bit of variety, we're going to talk about chicken this week. Tender, juicy, organic, free-range, Butcher Box chicken.
In my "small" Butcher Box, I chose two kinds of chicken. I was sent a 3.5-pound whole chicken and three one-pound packages of boneless, skinless chicken thighs. Oh, yes. Thighs, not breasts. As much as I like the bird boobies, the way that thighs shred apart make them perfect for stirfry. How about some Ginger Chicken with Balsamic Honey Sauce?
First, let's mise en place. (I even have an actual recipe for you this week, but you have to work for it by picking it out of the text.) I've got my ceramic-coated frying pan, a good knife for chopping, a cutting board, tablespoon, teaspoon, measuring cup, rubber spatula, fork, olive oil, Falksalt, pepper, ginger, garlic, shallot, chicken thighs, honey, white wine vinegar, balsamic vinegar, fish sauce, and chicken stock concentrate. Lemongrass is optional.
Rice
Then there's the rice... I want leftovers this time, so I'm going to cook two dry cups of rice. Yes, it's just the two of us, but my husband eats a ton of rice if it is available. You know, having grown up in a third world country and all... The pan for the rice is really important. You want one that heats evenly but doesn't retain the heat for a really long time after it's taken off the stove. I use a stainless steel pan; no Teflon for me. I've got two pans that are a good size for two cups of rice, but one of them has a very thick bottom. While a thick bottom may be good for some things, it's not good for making rice unless you are some kind of rice-cooking superstar.
They actually have close to the same capacity, so I don't use that fat-bottomed girl for rice.
Rice isn't an easy thing for me to cook. It's not hard to mess up. Overcook it and it's burnt to the bottom. Use the wrong pan, it's burnt to the bottom. Take it off the heat too soon, it's sloppy on the bottom and a little hard on top. Then there's the whole problem of different kinds of rice need different amounts of water. The Aldoha rice I've been making only needs 1.5 cups of water per cup of rice. Jasmine rice usually takes two cups of water. Always check the label and follow instructions for your rice. Does yours say to boil the water first? Use oil or butter?
I don't cook with butter unless I have to because I also don't use margarine. It's olive oil for me if I'm going to be adding fat. I usually buy rice that calls for it to be brought to a boil with the water. That way, I can mix the oil and salt in with the rice before I add the water. Make sure one tablespoon of oil per cup of rice is thoroughly mixed in to help keep the rice from sticking to the bottom in case it is a little bit overcooked. I also toss in a pinch of Falksalt, because it's the best. If I have it on hand, or the recipe I'm making calls for lemongrass, I use the hard outer layers of lemongrass to infuse flavor into the rice. Just cut it to be short enough to fit in your pot, then dig it out after the rice has rested.
When the rice has absorbed almost all of the water, remove it from the heat, but DO NOT STIR IT YET! This is a common mistake with rice and it will make it clumpy. Let the rice sit on a cold burner for at least ten or fifteen minutes before stirring. The reason is that while the water might be absorbed into the rice, it's not yet absorbed uniformly. Letting the rice rest gives the water time to move toward the center of each grain. Stirring your rice too soon will destroy the soggy outer layer of each grain. It's also not going to hurt your rice to sit longer than ten minutes, so start your rice before you even start chopping stuff for the sauce.
Chopping
If you're not super speedy with the knife, you might want to consider chopping everything for the sauce before you start cooking the chicken. It's easy to get distracted and let something on the stove burn if you're off looking for the next ingredient or fighting to get the things you're trying to chop to stop sticking to the knife.
The recipe I started with and manipulated into this called for a thumb of ginger. WTF is a thumb of ginger? Does that mean the size of my thumb? Someone said it's the size of the tip of your thumb. WHAT? *sigh* Whatever. I love ginger, even to the point of spicy sometimes. I used a big hunk of ginger about the size of my thumb. It made about a tablespoon of minced ginger.
First, peel the ginger. You don't have to use an actual peeler. A paring knife is fine. I choose to slice the ginger vertically into thin strips, then I mince the strips. Easy. I scrape it off onto a plate and move on to mincing the garlic. Or, if you want to go the easy route, it's about a tablespoon of pre-minced garlic.
I have a real issue with these fucked up measurements. A recipe calls for 1-2 cloves of garlic. What size cloves? What strength of garlic are you going for in this recipe? Is it meant to be strong or subtle? Is it one large or two small? Or is the range meant for adjustment of taste? Shit...I just want to know how much it should be for the taste you're trying to achieve. So, I'm going to say it--flat out--chop enough garlic to get one tablespoon. Yeah.
Then, the shallots. I could go on a similar rant about shallots, but I'll just show you a picture. Uh-huh.
Two shallot halves and three whole shallots.
I really like shallots. The flavor is more mild than onions, which means the fumes aren't as bad, either. Shallots don't seem to make my husband fart like onions do, so that's a bigger advantage than you can even fathom. They're also smaller than onions, which means I don't have to feel bad about not using a whole onion in one meal. (Don't store cut onions. Just don't. And again, onion farts...OMG, please, no.) Shallots are often two halves, meaning you can use one shallot for two different meals without even peeling the whole thing! Damn, I love shallots!
For this recipe, I cut up one, whole, large shallot. It made about a quarter cup at a fine dice. Set it aside, too.

Let's get cooking!
I rinse my organic, boneless, skinless chicken thighs in the sink and pat it dry. Season with salt and pepper. I prefer Wild Garlic Falksalt with this recipe. Of course, there is no pre-ground pepper in my kitchen. I like to grind it myself.
Heat the pan up for the chicken just like the steak--an empty pan over medium heat. Wait until heat can be felt emanating from the bottom, then add a drizzle of olive oil. When the oil is hot, but before it starts smoking, add the seasoned chicken thighs. Move them around often because even with the oil--even with a non-stick pan--the chicken will stick if left in the same spot for too long. Turn them every few minutes or so, until they are cooked throughout. It's okay if they start to fall apart. When they're done cooking, set them aside on a plate and tent with foil to keep it warm.

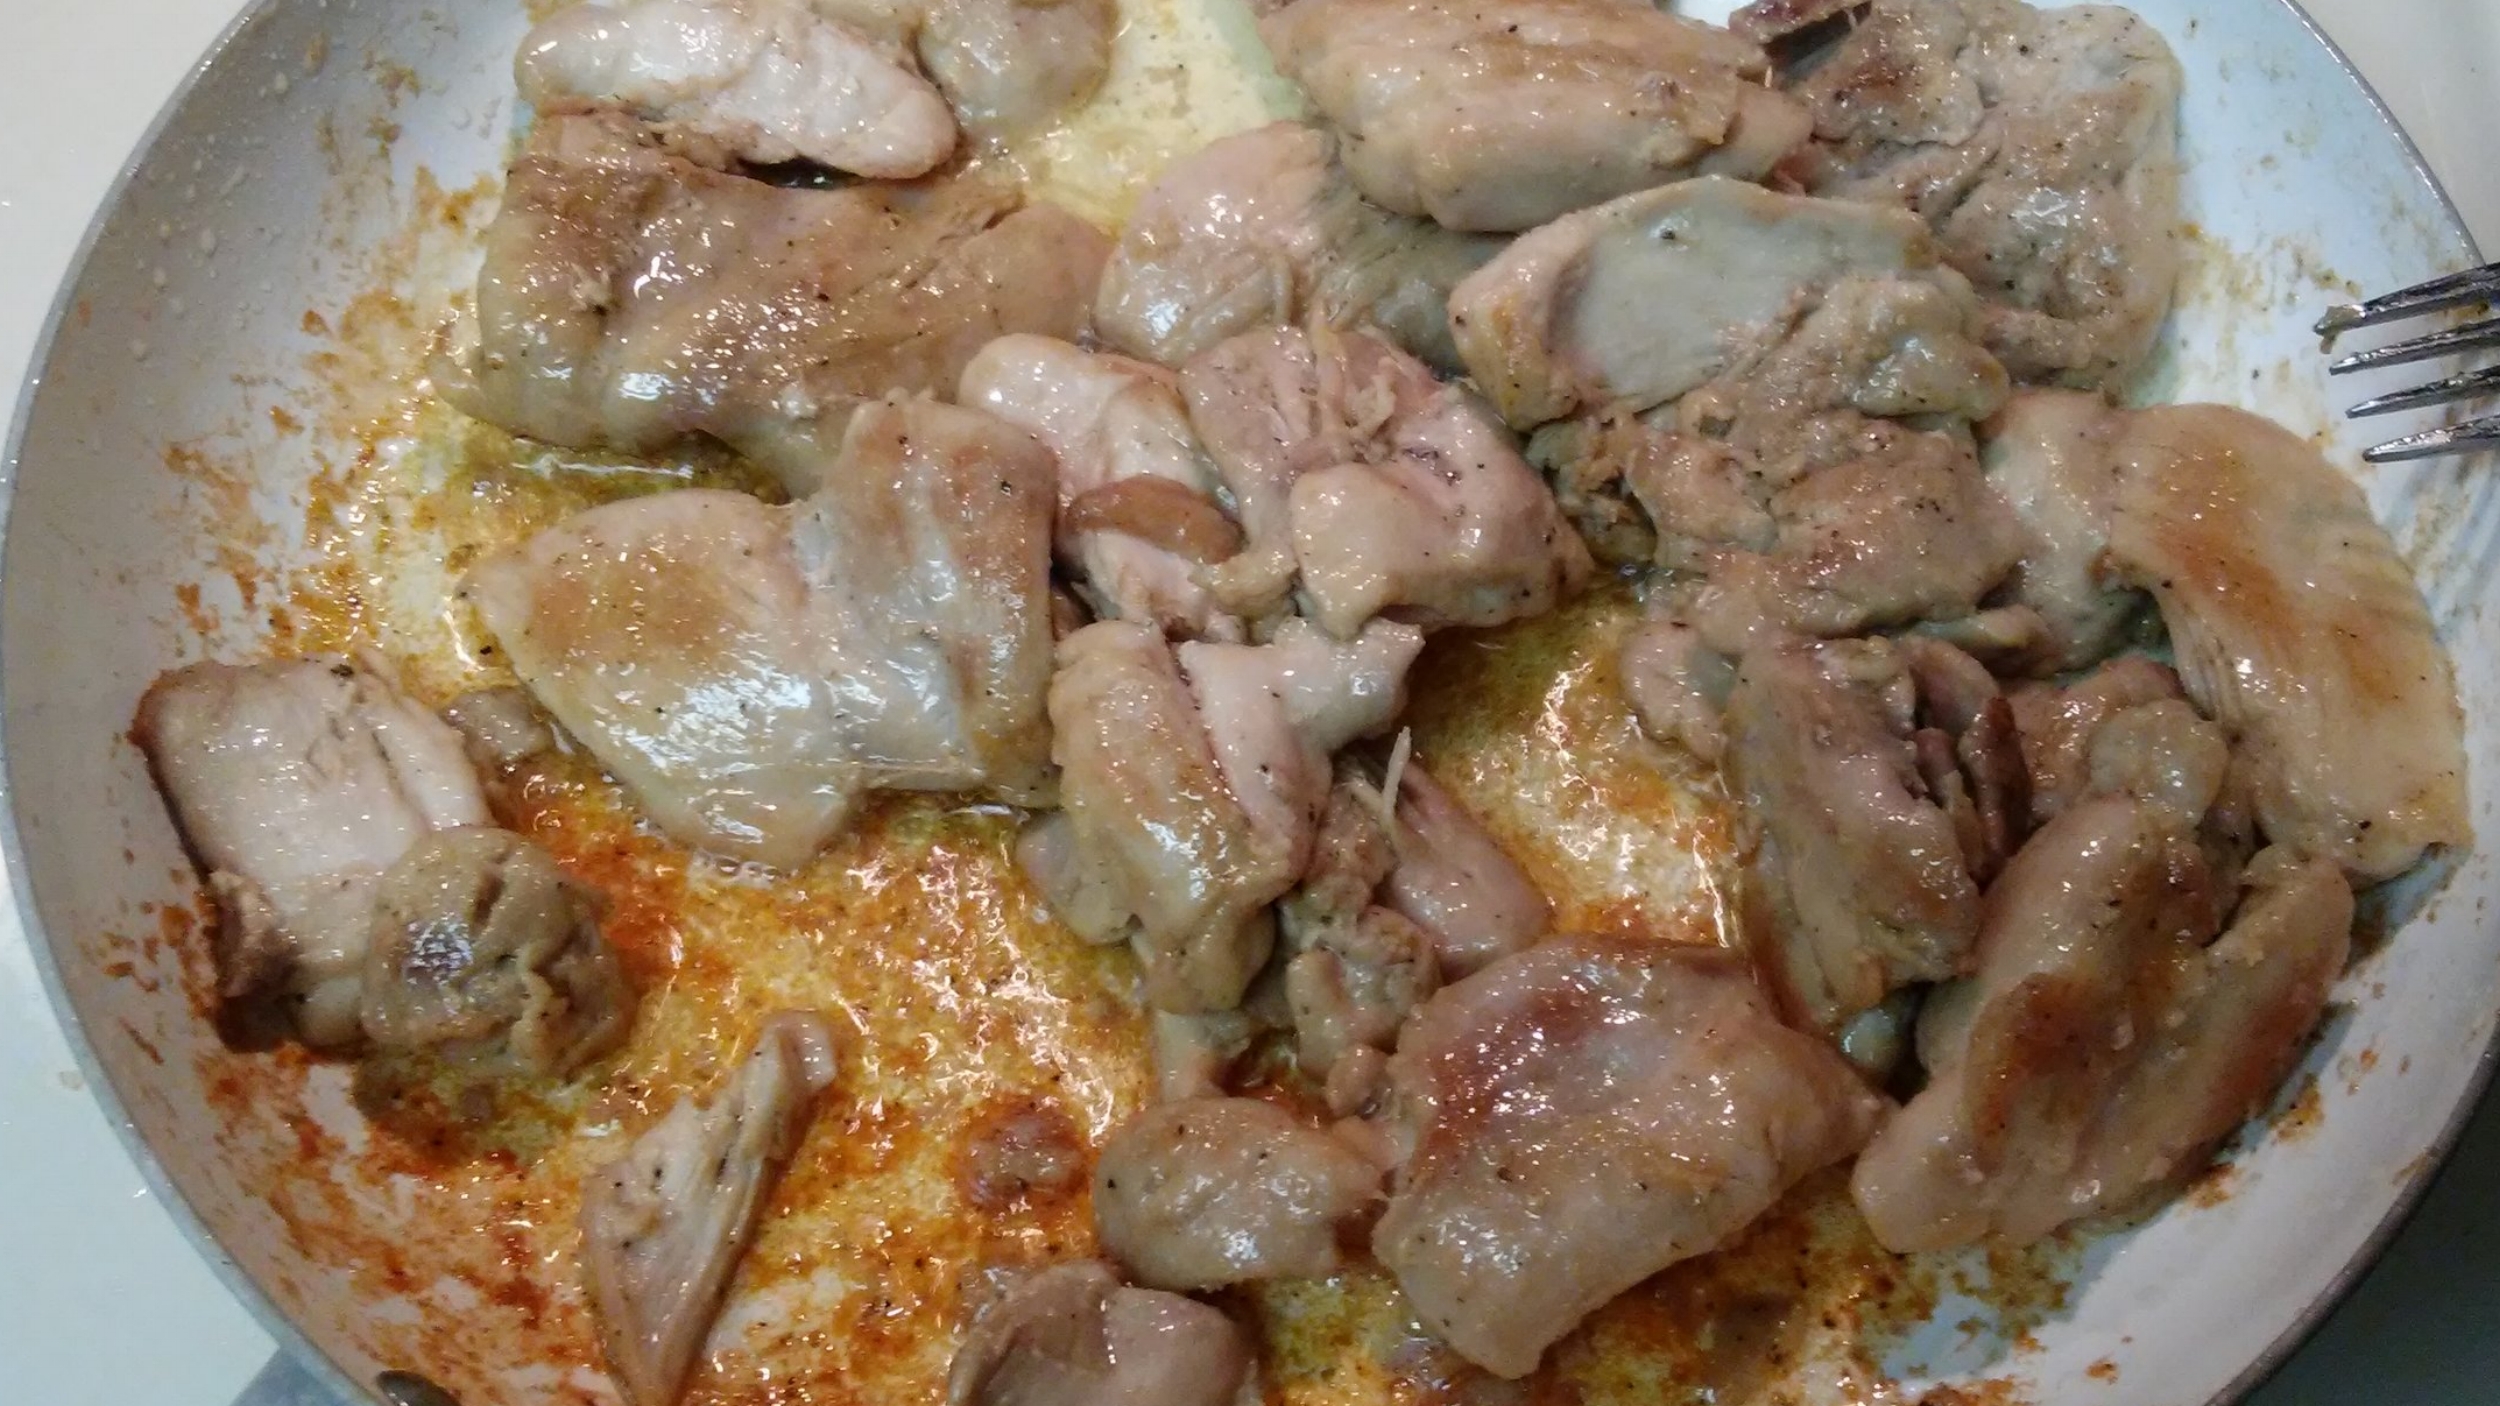
The chicken thighs can be a little fatty, so you may end up with more grease in the pan than you started with. Pour some off or soak it up with a towel so that you only have about one to two tablespoon of oil/grease left in the pan. If you leave too much in there, it's going to make your sauce greasy. If you don't leave enough, your other ingredients will burn and stick to the pan. Use your best judgement by eyeballing how much oil you think will be absorbed into the sauce. Or, if you're watching your fat intake, pour off all of the grease and drizzle some fresh olive oil into the pan.


Time to get saucy!
Add the shallots to the hot oil and saute until they are translucent. Add the garlic and ginger. If you have fresh lemongrass, add a half teaspoon of the chopped core. Cook 30-60 seconds or until fragrant. By this point, the bottom of your pan is going to be pretty crispy. That means it's time to bust out the vinegar. Pour about one tablespoon of white wine vinegar and two tablespoons of balsamic vinegar across the bottom of the pan. Use a rubber spatula to scrape the bottom and watch all of that burnt stuff dissolve away and form a kind of goo around the stuff you sauteed.
This is where mise en place comes into play. You need to have your water and stock concentrate handy. If you wait too long to pour in the water, then the sauce will start burning to the bottom of the pan again. So, one cup of water first, then a teaspoon of low sodium chicken stock concentrate.** I really love the Better Than Bullion brand. Mix it in until the sauce is an even color. Add four tablespoons of honey and one tablespoon of fish sauce. Reduce the heat to medium-low and simmer until the sauce has reduced by half.


Shred it!
Well, not shredded like the beef, but use two forks to pull the meat apart along its natural divisions. This is exactly why I love the thighs so much; they pull apart into natural, bite-sized pieces. It doesn't have to be perfect, though, because it will want to come apart while you toss it in the sauce.
Dump the chicken back into the pan and stir it to coat it in the sauce. Are you getting hungry? I know I am.


Putting it all together
Once the chicken is coated in sauce, you can go back to the rice. Dig out the lemongrass--if you used it--and fluff the rice with a fork. Nice and fluffy, right? Sometimes, having patience can pay off. Heap some onto your plate, and top it with some chicken. Make sure you get some of that sauce on there, too!
Take a big whiff of that delicious steam pouring from your plate. Ginger, garlic, shallots, and honey, mixing with the sharpness of the balsamic to create this palate-pleasing dish.
Don't forget to pack any leftovers in glass containers to presserve the flavors.
Oh, did I forget about a vegetable? Damn...Yeah. I did. I bet frozen peas would go awesome with this sauce. I'll have to make this again someday and update this blog. Maybe even just a simple bag of stir-fry veggies? I think that would also be pretty great.
This chicken was so fantastic. I really love this meat from Butcher Box. It has never disappointed me by being dry or tough. This chicken was so tender and juicy. I have never, ever had frozen chicken that was so freaking delicious as this was! The chicken my husband brings home from his grocery store doesn't hold a candle to this Butcher Box chicken. If you'd like to give it a try, click here to get a bonus of 2 filet mignon steaks, a package of bacon, and $10 off your first box!
Okay, that's it for this week. But be sure to come back next week. I got ballsy and bought an air fryer. You've seen those infomercials, right? The big glass dome one, or maybe you've seen the big plastic thing with a copper-lined drawer? I'm testing one so you don't have to.
**As a side note, it is very important to never use powders or bulion cubes in quick sauces like this. It must already be a cream or paste in order to fully dissolve into the sauce. If you just can't find a wet concentrate, you can omit the water and just use a whole can of chicken broth. It'll take longer to condense the sauce, but it will turn out just as good.